HomeArticleHow to Use PdaNet+ to Tether Without Root & Bypass Carrier Throttling
How to Use PdaNet+ to Tether Without Root & Bypass Carrier Throttling
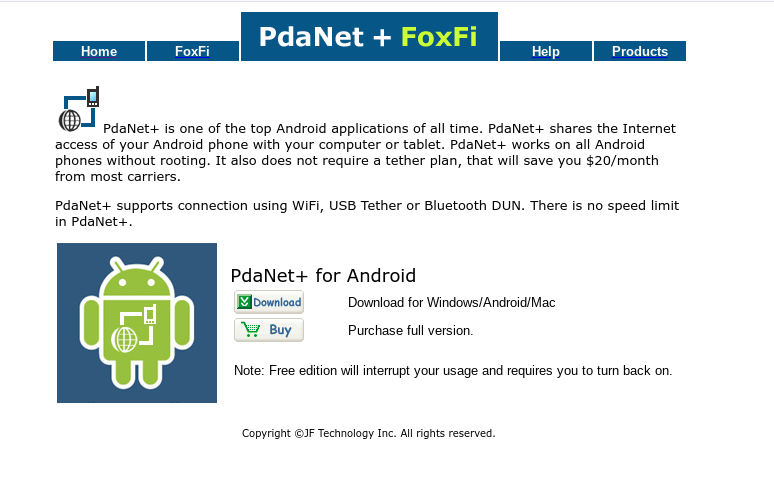
In today’s fast-paced world, staying connected is essential. Unfortunately, many mobile carriers restrict tethering, limiting your ability to share your smartphone’s internet connection with other devices.
To tether without root access you typically need to pay for your service providers data plan, and even then they often throttle it after so much data is used.
PDANet+ can hide tether usage as regular phone app data, thus allowing you to bypass carrier throttling & data caps! Best of all PdaNet+ offers a simple, reliable solution that doesn’t require rooting your Android device and can even bypass carrier throttling restrictions.
In this guide, we’ll discuss how to set up and use PdaNet+, explore its features, and provide tips for ensuring a seamless tethering experience.
Why Use PdaNet+ for Tethering?
Tethering your Android device can turn it into a portable internet hub, but many carriers charge extra or limit this feature. PdaNet+ eliminates these barriers, allowing you to share your data plan without rooting your device or paying additional fees.
Key Benefits of PdaNet+:
No Root Required: Avoid the risks of rooting, such as voided warranties and potential security vulnerabilities.
Bypass Carrier Restrictions: Share your mobile internet without triggering throttling or incurring extra charges.
Multiple Tethering Options: Choose from USB, Wi-Fi Hotspot, or Bluetooth DUN for the most convenient setup.
Ease of Use: Its simple, intuitive interface ensures even beginners can set up tethering in minutes.
How to Set Up PdaNet+
Here’s a step-by-step guide for setting up PdaNet+ on your Android device and computer. Download PdaNet+ from the official website before you begin.
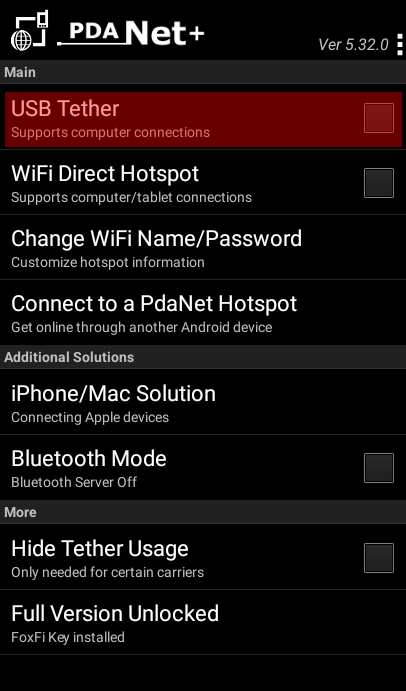
1. Setting Up USB Tethering
USB tethering offers the most stable and secure connection, making it ideal for tasks like gaming, remote work, or streaming.
Steps:
Enable Developer Options:
Go to your phone’s Settings > About Phone > Tap “Build Number” 7 times.
Navigate to Developer Options > Enable USB Debugging.
Install the PdaNet+ Client:
Download the desktop client for your OS (Windows or Mac).
Connect Your Phone to the Computer:
Use a USB cable and launch PdaNet+ on both devices.
Activate Tethering:
On your phone, open PdaNet+ and select “USB Tether”.
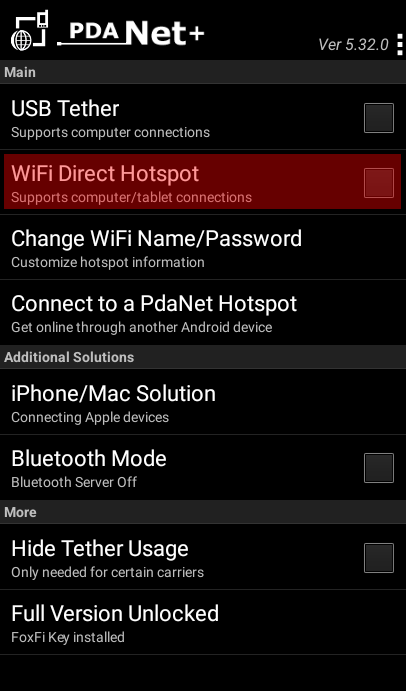
2. Setting Up Wi-Fi Hotspot Tethering
If you need to connect multiple devices wirelessly, Wi-Fi tethering is your best option. PdaNet+ can bypass carrier-imposed restrictions on mobile hotspots.
Steps:
Open PdaNet+ on your phone.
Select “Wi-Fi Direct Hotspot”.
Share the network name and password with the devices you want to connect.
On other devices, search for available Wi-Fi networks and connect to the one created by PdaNet+.
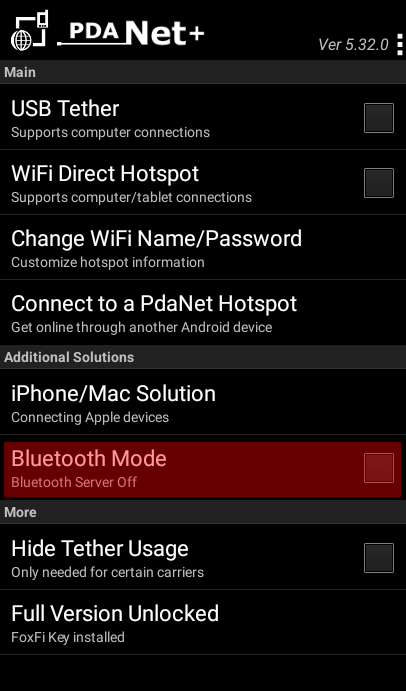
3. Setting Up Bluetooth DUN Tethering
Bluetooth DUN (Dial-Up Networking) is useful when USB cables or Wi-Fi aren’t practical.
Steps:
Pair your phone with your computer via Bluetooth:
Go to Settings > Bluetooth and enable pairing mode on both devices.
Open PdaNet+ and select “Bluetooth DUN”.
Follow the on-screen instructions to establish the connection.
Using PdaNet+ Wi-Fi Direct Hotspot with Proxies
If you’re connecting a device like a Linux machine or something that doesn’t have native support for the PdaNet+ client, follow these steps to ensure it works via the required proxy settings:
1. Connect to the Wi-Fi Direct Hotspot
On your Linux machine or other device, connect to the Wi-Fi network created by PdaNet+.
The network name and password are shown in the PdaNet+ app on your Android device under Wi-Fi Direct Hotspot.
2. Configure the Proxy Settings
To get internet access, you must manually configure the proxy settings for the connection:
Go to your Network Settings on the device.
Select the connected Wi-Fi network (the one from PdaNet+).
Set the proxy to Manual and use the following details:
Proxy IP: 192.168.49.1
Port: 8000
3. Save and Test
Save the configuration.
Open a browser or application to test the internet connection. If set up correctly, you should now have access.
Notes:
Apps or services that don’t respect system-wide proxy settings (e.g., some games or command-line tools) may require additional configuration.
For advanced setups, tools like Proxychains or browser-specific proxy configurations can be used.
This straightforward setup lets non-compatible devices connect via PdaNet+ with minimal hassle.
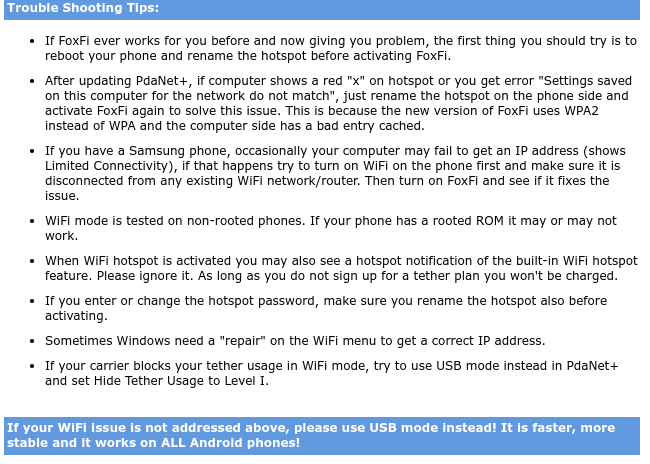
How PdaNet+ Bypasses Carrier Throttling
Carriers often throttle or cap data speeds for tethering. PdaNet+’s “Hide Tether Usage” feature masks tethered data as regular smartphone data passing through the device, making it harder for carriers to detect.
Steps to Enable “Hide Tether Usage”:
Launch PdaNet+ on your phone.
Go to Settings > Hide Tether Usage.
Enable the feature and begin tethering as usual.
For added security and privacy, use a VPN alongside PdaNet+. This encrypts your connection and further obscures your activity from your carrier.
Data Usage and Legal Considerations
Monitor Your Data:
Tethering uses data from your smartphone plan. Keep track of your usage to avoid overages, especially if your plan includes limited data.
Know Your Carrier’s Terms:
While PdaNet+ can bypass restrictions, unauthorized tethering may violate your carrier’s terms of service. Be aware of potential consequences such as throttling, added charges, or even account suspension on less scrupulous providers.
Frequently Asked Questions (FAQs)
Q: Can carriers detect tethering with PdaNet+?
A: The “Hide Tether Usage” feature minimizes the chances of detection, but it isn’t foolproof. Using a VPN provides an additional layer of security.
Q: Does PdaNet+ work with all Android devices?
A: PdaNet+ supports most Android phones, but certain features may vary depending on your device’s model and Android version.
Q: What should I do if my connection keeps dropping?
A: Ensure your USB cable is functional for USB tethering. For Wi-Fi or Bluetooth, try turning your WiFi off then back on, and if it persists restart the devices and ensure strong signals.
Alternatives to PdaNet+
If PdaNet+ isn’t the right fit, consider these options:
EasyTether: A lightweight app that supports USB and Bluetooth tethering.
NetShare: Focuses on creating Wi-Fi hotspots and sharing internet over a local network.
Feature
PdaNet+
EasyTether
NetShare
USB Tethering
✔
✔
✘
Wi-Fi Hotspot
✔
✘
✔
Bluetooth Tethering
✔
✔
✘
Conclusion
PdaNet+ is a powerful tool for Android users who want to tether without rooting or dealing with carrier restrictions. Whether you’re working remotely, gaming, or streaming, its versatile tethering options and throttling bypass features make it an invaluable app.